User Guide
This comprehensive guide covers all features and workflows in Chamelingo, Unity's powerful localization solution.
New to Chamelingo?
If you're just getting started, we recommend following the Getting Started Guide first to set up your project, then return here for detailed feature documentation.
Table of Contents
Setup & Configuration
Working with Translations
Implementing Localization
- Chamelingo Text Components
- Normal Translation Mode
- Composite Text Mode
- Custom Localizer
- Language Selection Dropdown
- Inspector Decorator
Resources
Project Settings
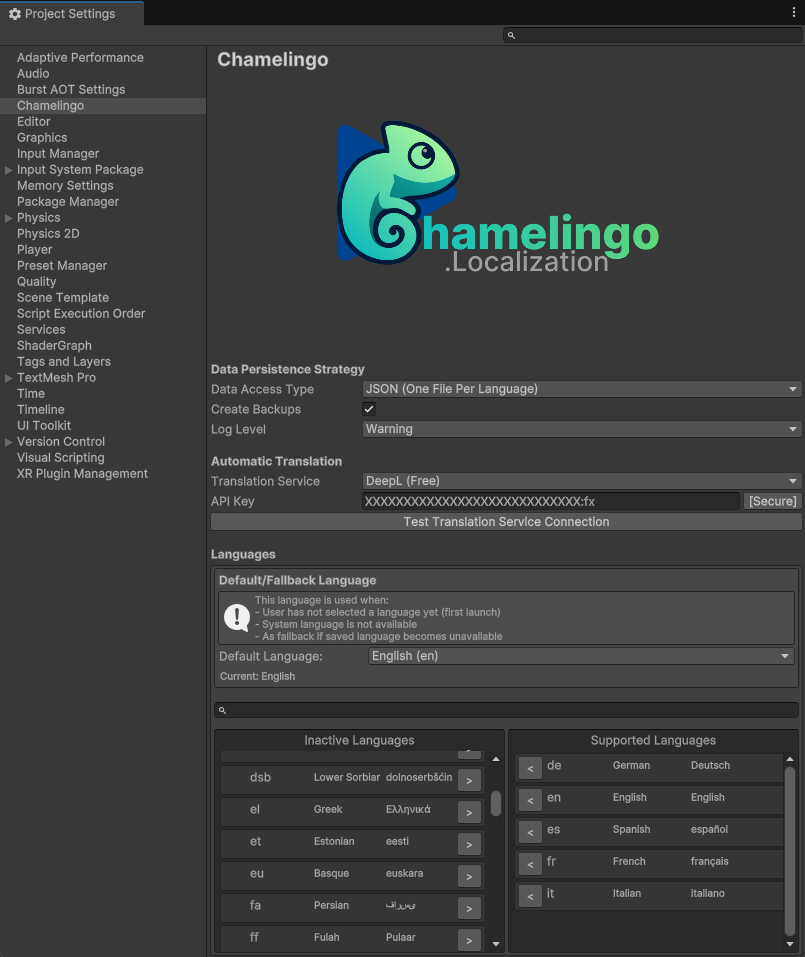
The Project Settings are the foundation of your localization setup. Configure these first before working with translations.
Access Project Settings:
Edit -> Project Settings -> Chamelingo
You can also open Project Settings directly from the Chamelingo Hub by clicking the settings icon in the top-right corner.
Data Persistence Strategy

Configure how Chamelingo stores your translation files. All translation files are stored under Assets/Resources/Translations and must be included in your application's final build.
Changing Storage Formats
You can change your data persistence strategy at any time. Chamelingo automatically migrates your existing translations to the new format. See the Getting Started Guide for more details on choosing the right format.
Available Storage Formats
JSON (One File Per Language)
Creates a separate JSON file for each language with the following structure:
{
  "LanguageCode": "en",
  "Translations": {
    "showcase.hello": "hello",
    "showcase.how_are_you": "how are you",
    "showcase.selected": "selected",
    "showcase.hello_world": "hello world",
    "showcase.colors.black": "black",
    "showcase.colors.blue": "blue",
    "showcase.enter_username": "enter username...",
    "showcase.exit": "exit",
    "showcase.settings": "settings",
    "example.newkey": ""
  }
}
Best For: Small projects and easy manual editing
CSV (Single File)
Creates one CSV file containing all languages:
| Key | de | en | es | fr | it |
|---|---|---|---|---|---|
| showcase.hello | hallo | hello | hola | Bonjour | ciao |
| showcase.hello_world | Hallo Welt | hello world | hola mundo | Bonjour le monde | ciao mondo |
| showcase.colors.black | schwarz | black | negro | noir | nero |
| showcase.colors.blue | blau | blue | azul | bleu | blu |
| showcase.enter_username | Benutzernamen eingeben... | enter username... | introducir nombre de usuario... | entrer le nom d'utilisateur... | inserire il nome utente... |
| showcase.exit | Verlassen | exit | salir | sortie | uscita |
| showcase.settings | Einstellungen | settings | ajustes | paramètres | impostazioni |
Best For: Larger projects using spreadsheet tools, though file size may become large
CSV (Multiple Files)
Creates a separate CSV file for each language:
| Key | Translation |
|---|---|
| showcase.hello | hello |
| showcase.hello_world | hello world |
| showcase.colors.black | black |
| showcase.colors.blue | blue |
| showcase.enter_username | enter username... |
| showcase.exit | exit |
| showcase.settings | settings |
Best For: Large projects using spreadsheets, optimal for managing translations per language
External Translation Workflow
You can edit or create translation files using third-party tools or external translation contractors.
To import externally created translations:
1. Ensure the file follows the correct data format
2. Place the file with the correct naming in Assets/Resources/Translations
3. Chamelingo automatically detects and updates when new files are added
Backup Options
Enable the Backup checkbox to create backup files with the .bckp suffix when deleting a language.
Restoring Backups
To restore a backed-up language, manually remove the .bckp suffix from the backup file.
Log Level

Configure what Chamelingo outputs to the Unity Console. This setting applies to both Editor and Runtime.
Automatic Translation

Configure or disable automatic translations by selecting and setting up one of the supported translation services.
Setup Guide
For detailed setup instructions, see the Getting Started Guide - Auto-Translation Setup.
Supported Translation Services
- Setup: No API key required
- Optional: Add your email to increase request limits
- Quality: Lower quality translations
- Cost: Completely free
- Setup: Configure the endpoint URL (typically self-hosted or private server)
- Optional: API key (depending on server configuration)
- Quality: Limited quality
- Cost: Free (self-hosted or public instance)
- Setup: Requires API key and Google Cloud Translate API activation
- Quality: Reliable and widely used
- Cost: May incur costs based on usage
DeepL Free (Recommended)
- Setup: Requires free account signup and API key
- Quality: High quality translations
- Limit: ~500,000 characters per month
- Cost: Free with character limits
- Setup: Similar to free version with API key
- Quality: Highest quality translations
- Limit: Increased limits
- Cost: Requires premium subscription
- Setup: Requires Azure account and Translator API enabled
- Quality: Reliable enterprise solution
- Cost: Some free tier available, primarily enterprise-level pricing
Testing Translation Service
After configuring your translation service, click the Test Translation Service Connection button to verify the connection. A dialog will indicate whether the connection was successful.
API Key Security
API Key Storage
API keys are stored securely in your EditorPrefs (Windows Registry). They are never stored in publicly accessible locations, meaning each user must configure their own API key. DeadLock Development never has access to your keys.
Security Best Practices
- Never share your API keys
- Sharing API keys is a security risk
- Can lead to financial loss if you have a paid plan
- Monitor your translation service usage and billing
Languages
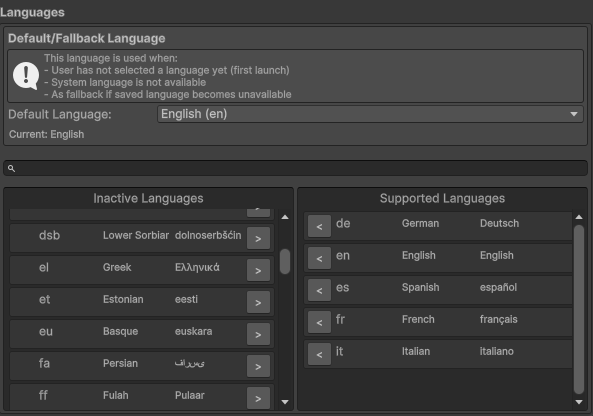
Configure which languages your application supports and set the default fallback language.
Neutral Cultures Only
Chamelingo uses IETF BCP 47 neutral culture codes (e.g., en, de, fr) rather than region-specific codes (e.g., en-US, de-DE). See the API Reference for more details on language tag formats.
Adding Languages
- Use the search bar or scroll through available languages
- Click the [>] button next to a language to add it to supported languages
Removing Languages
- Find the language in the Supported Languages section
- Click the [<] button to remove it
Language Backups
If you've enabled the backup option, removed languages will be backed up. To restore, manually remove the .bckp suffix from the backup file.
Default Language
Set a default/fallback language for your application. This is important for devices that don't support any of your configured languages.
Language Selection Priority
Chamelingo automatically manages language selection with the following priority:
- User's Saved Language - If the user previously selected a language, it will be used
- System Language - If no saved choice exists, the device's system language is used
- Default Language - If the system language isn't supported, your configured default language is used
- First Available - If the default language isn't found, the first available language is used
Language Persistence
When a user changes language (via the Language Selection Dropdown or programmatically through the API), it's saved to PlayerPrefs and persists across app restarts on any device. Users only need to select their language once—it will be remembered even after closing and reopening your app.
Chamelingo Hub
The Hub is the central editor component of Chamelingo, providing a unified interface for managing localization in your project.
The Hub is your central command center for managing all aspects of localization in Unity. After completing initial Project Settings configuration, you'll spend most of your time in the Hub.
Opening the Hub
When you first install Chamelingo, it automatically opens the Hub with the Welcome View. To manually open the window at any time:
Window -> Chamelingo

Hub Overview
The Hub features a clean, intuitive layout:
Navigation Tabs: At the top, you can switch between different views:
- Welcome - Quick start information and helpful links
- Dashboard - Overview of all localizable components in your scene and prefabs
- Translations - Manage translation keys and values
- Help - Documentation and support resources
Toolbar: Each view has its own toolbar with:
- Optional search bar for filtering content
- Action buttons specific to that view
- Refresh button to manually update the current view
Settings Access: The settings icon button in the top-right corner directly opens the Chamelingo Project Settings.
Docked Window Layout
The Hub is optimized for use as a docked window. We've designed it to be as compact as possible while remaining functional. Experiment with different layouts to find what works best for your workflow.
Dashboard View
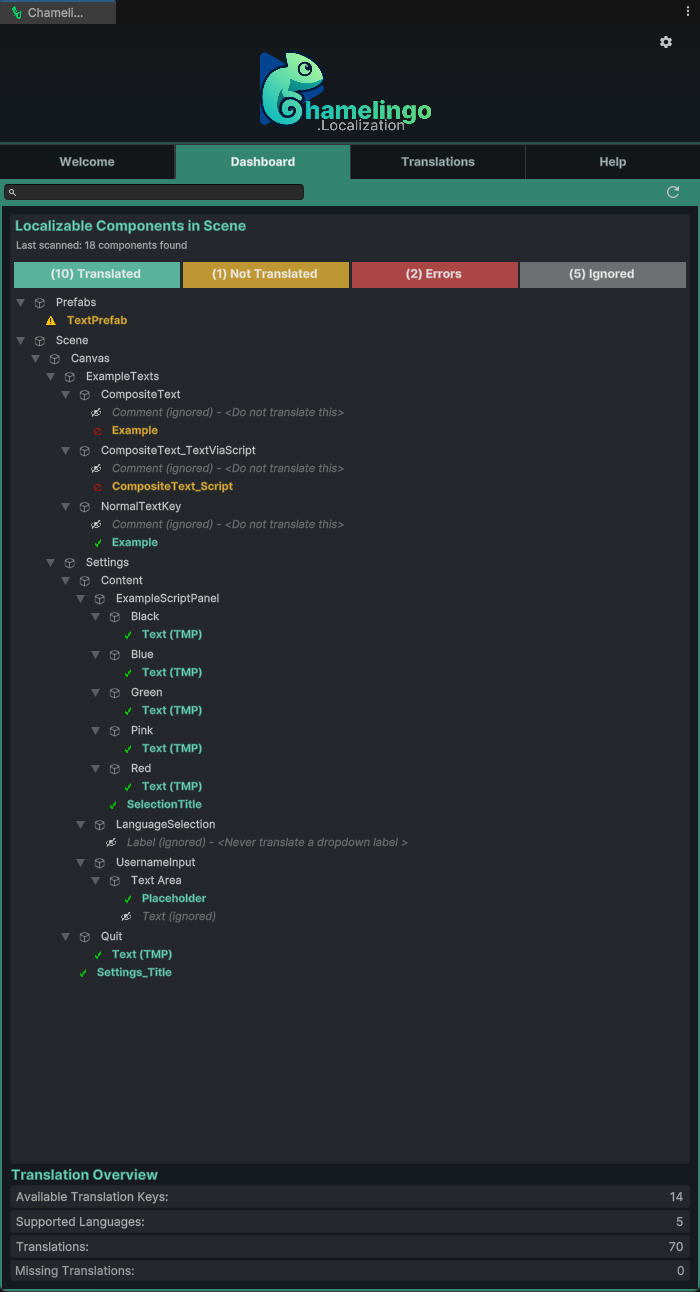
The Dashboard displays all localizable text components in your current scene and prefabs, showing their localization status:
Status Indicators:
- Translated (✓ Green Text) - Component has Chamelingo localization applied
- Not Translated (⚠️ Orange Text) - Text component detected but not localized
- Ignored (👁️🗨️ Grey Italic Text) - Component marked to be excluded from localization
- Error (🛑 Orange Text) - Localization component has configuration issues such as missing keys or component references when using composite text
For more details on these statuses, see the Inspector Decorator section.
Searching and Filtering
The Dashboard provides search and filter capabilities to help you manage localization efficiently.
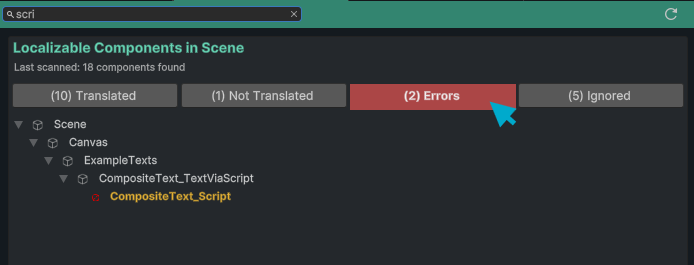
Search: Use the search field in the toolbar to find specific components by name.
Filter: Click a filter button to show only components with that specific status. Click again to show all components. This behavior allows only one filter state at a time (or all), which we found to be the most useful approach for quick navigation.
Quick Actions
Open Inspector: Double-click any component in the Dashboard to select its GameObject in the scene hierarchy or prefab and display its Inspector window.
Context Menu: Right-click on any component to access quick actions:
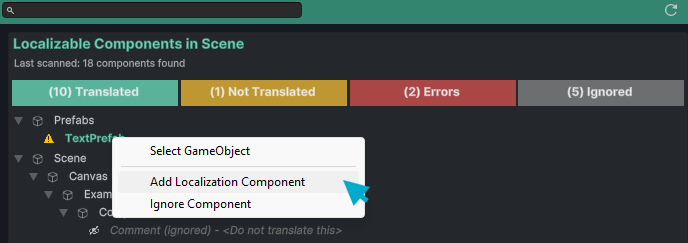
- Add Localization Component - Quickly add the Chamelingo localization component
- Ignore Component - Mark the component to be excluded from localization (see Ignoring Components below)
Ignoring Components
When you ignore a component via the context menu, a dialog appears asking if you'd like to add a note. This is useful for documenting why a component shouldn't be localized, especially when working in larger teams.
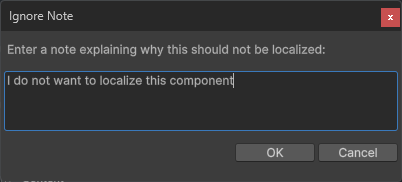
Once ignored, the component will display with the "Ignored" status and no longer appear as "Not Translated" in your Dashboard:

Translation Overview
At the bottom of the Dashboard, you'll find the Translation Overview section providing key statistics:

Statistics Displayed:
- Available Translation Keys - Number of translation keys created
- Supported Languages - Number of configured languages
- Translations - Total translation entries across all keys and languages
- Example:
hello.worldwith 3 languages (de, en, fr) = 3 translations - Missing Translations - Number of incomplete translations
Missing Translations
Missing translations will result in empty strings in your application. Always ensure all keys have translations for every configured language to avoid displaying blank text to users. Use the Translations View to identify and fill missing translations.
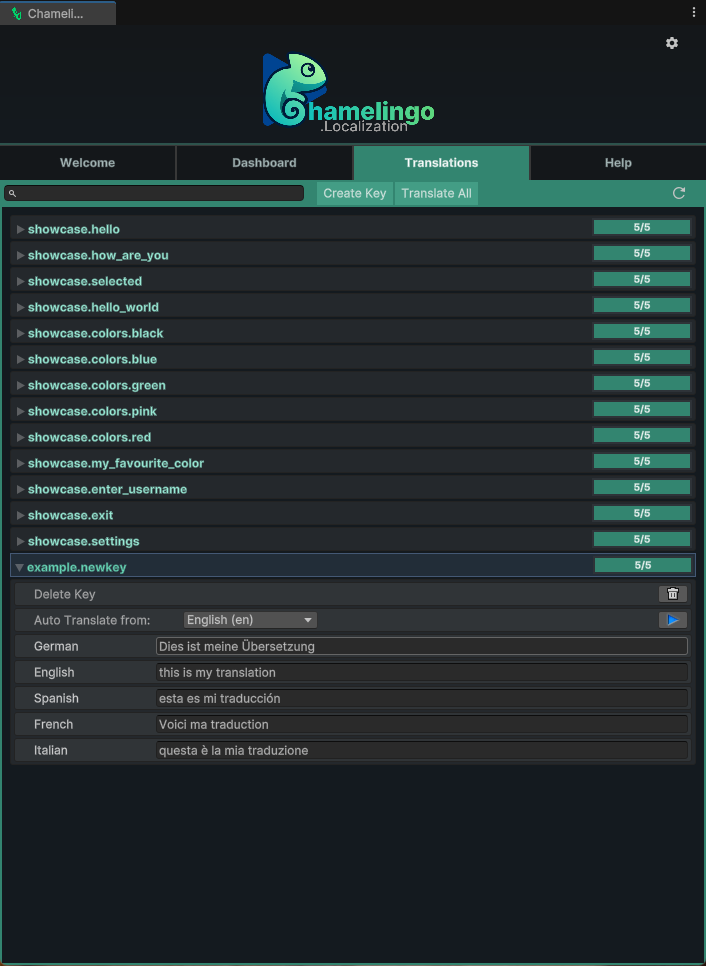
Translations View
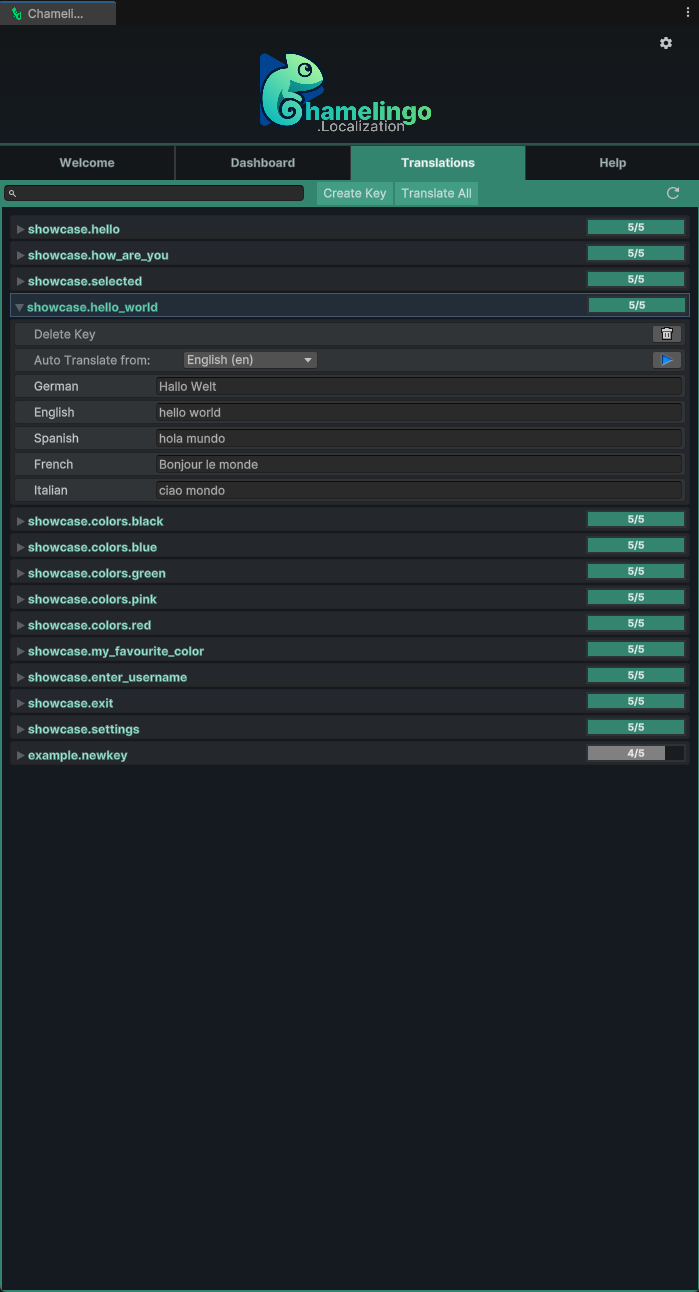
The Translations tab is where you manage all translation keys and their values across all configured languages.
Preview Mode
The Translations tab includes Preview Mode configuration, which allows you to visualize localized content directly in the Unity Editor. When Preview Mode is enabled, text components and Custom Localizers display their localized values at edit time without entering Play Mode. You can also switch between languages from this section or disable Preview Mode entirely.
Editor Visualization
Preview Mode is a powerful tool for verifying translations and testing different language configurations without running your game. Changes are visible immediately in the Scene and Game views.
Toolbar Actions
The Translations tab includes a search bar and action buttons to streamline your workflow:
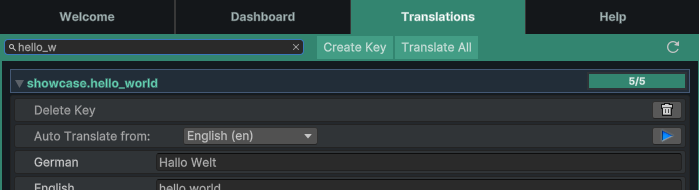
Search: Use the search bar to quickly find specific translation keys by name.
Create Key: Opens the Key Creation Dialog where you can add a new translation key.
Translate All: This button appears when you have configured a translation service in the Chamelingo Project Settings. Clicking it will automatically translate all missing translations across all keys using your configured service.
API Usage
Using "Translate All" can generate hundreds of API requests to your translation service, which may incur costs or hit rate limits depending on your service plan.
Managing Translation Keys
Each translation key is displayed as an expandable row showing:
- Key Name - The translation key identifier
- Progress Bar - Visual indicator of translation completeness (green = all languages have translations)
Translation Completeness
A green progress bar indicates that all supported languages have text entries for this key, but does not guarantee the translations are accurate or contextually correct.
Editing Translations
Click on any key row to expand it and view all translations for that key:
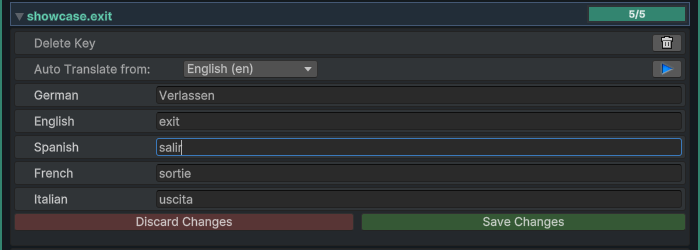
Editing Workflow: 1. Expand a key to view all language translations 2. Edit any translation field as needed 3. Save or Discard buttons appear at the bottom of the expanded key 4. Click Save to apply changes or Discard to revert
Auto-Save Behavior
Changes are automatically saved when you switch to another key or execute auto-translate actions.
Key Actions
Each expanded key provides additional actions:
Edit Key: Allows you to rename the translation key. When you save the changes, you'll be prompted to choose whether to update references to this key in the current scene, throughout the entire project, or not at all. If you choose to update references, Chamelingo will scan all components and update the key automatically. Note that this will not update keys referenced in your own custom scripts.
Copy Key: Creates a duplicate of the current key with a numeric suffix (_1, _2, etc.). This is useful when you need to create slight variations of an existing translation key.
Delete Key: Removes the translation key and all its translations. You'll be prompted to confirm before deletion to prevent accidental data loss.
Auto Translate: If you have configured a translation service in the Project Settings, you can: 1. Select a source language from the dropdown 2. Click the > button to translate from the source language to all other languages 3. The translation service will process the text and populate all language fields
Translation Service Limitations
- Auto-translation will overwrite existing translations without confirmation
- Not all translation services support all languages
- Check the Unity Console for any errors if translations fail
- Some services may have character limits
Welcome View
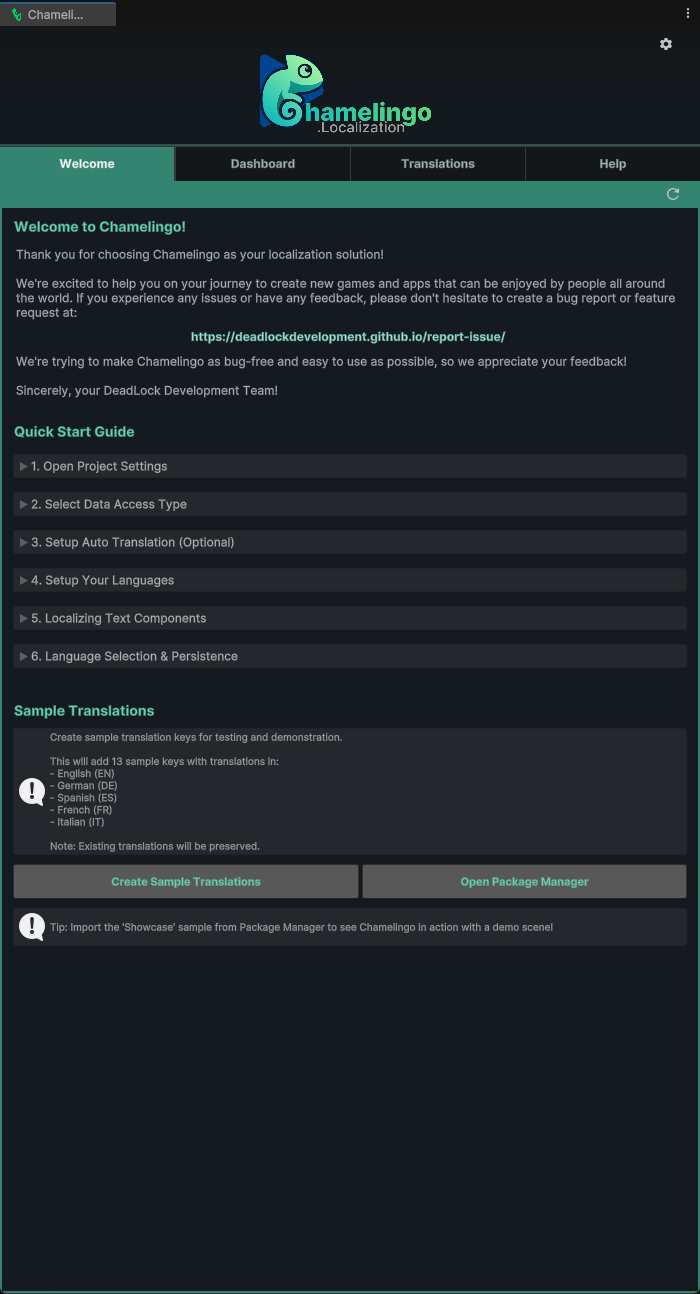
The Welcome tab is your entry point to Chamelingo, providing a quick-start guide directly within the editor.
Sample Translations
At the bottom of the Welcome view, you'll find two buttons to help you get started quickly:
Create Sample Translations: Creates basic translation keys with example text in multiple languages. These sample translations are used in the Showcase Sample Scene that ships with Chamelingo.
Safe to Use
Sample translations will not override any existing translations in your project. They only add new keys if they don't already exist.
Open Package Manager: Opens the Unity Package Manager window and automatically selects Chamelingo. From here, you can import the Showcase Scene sample.
First-Time Import
When importing the Showcase Sample Scene for the first time, sample translations are automatically created if they don't exist.
Help View
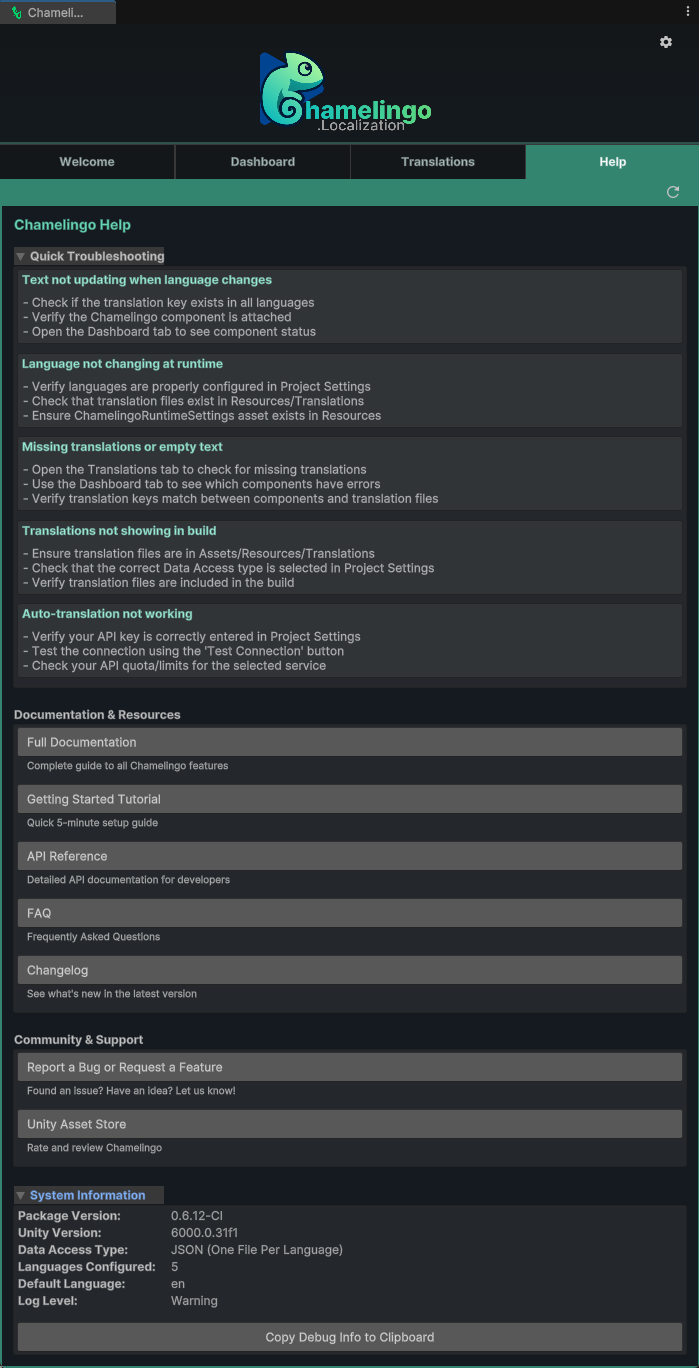
The Help tab provides quick access to documentation, support resources, and troubleshooting information.
Quick Troubleshooting
- Quick help tips for common issues
Documentation & Resources
- API Reference - Complete programming interface documentation
- Technical Documentation - Architecture and system design
- Getting Started Guide - Initial setup walkthrough
- FAQ - Frequently asked questions
Community & Support
- Report Issues - Submit bug reports and feature requests
- Main Documentation - Return to Chamelingo overview
System Information
At the bottom of the Help view, you'll find an expandable System Information section that displays:
- Chamelingo package version
- Unity version
- Data access type configuration
- Other relevant system details
Copy to Clipboard: Click the copy button to copy all system information to your clipboard.
Bug Reporting
When reporting issues at our issue tracker, always include your system information. Click the copy button and paste the details into your bug report to help us diagnose problems quickly.
Key Creation Dialog
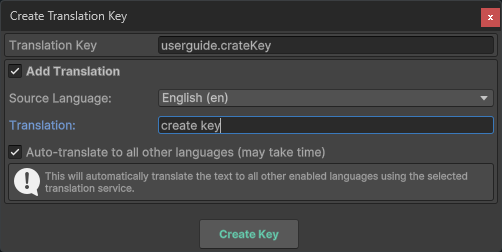
The Key Creation Dialog appears whenever you need to create a new translation key. You can access this dialog from: - The Create Key button in the Translations View - The key selector dropdown in Chamelingo Text Components
Translation Key Input
Enter your desired translation key in the input field at the top of the dialog.
Best Practices for Key Naming:
// ✅ Good: Hierarchical and descriptive
"menu.start"
"menu.settings"
"ui.health"
"ui.score"
"dialog.welcome.title"
"dialog.welcome.message"

// ❌ Avoid: Generic or unclear
"text1"
"button"
"msg"
Naming Convention
Use a hierarchical dot notation structure (e.g., section.subsection.element) to keep your translation keys organized and easy to manage as your project grows.
Initial Translation
To add an initial translation when creating the key, enable the Add Translation checkbox:
- Select the Source Language from the dropdown
- Enter your translation text in the Translation input field
Auto-Translation
If you've configured a translation service in the Chamelingo Project Settings, you can enable the Auto Translate checkbox to automatically translate your text to all other configured languages.
How It Works: 1. Enable Auto Translate 2. The translation service will translate from your source language to all other languages 3. Processing may take a few seconds depending on the number of languages
API Costs & Limits
Auto-translation generates one API call per target language (excluding the source language). If you support many languages, this can quickly add up. Monitor your translation service plan limits and associated costs.
Creating the Key
Click the Create Key button to: 1. Create the new translation key 2. Save the initial translation (if provided) 3. Run auto-translation (if enabled) 4. Close the dialog
Once created, you can use the key immediately in your components and further edit it in the Translations View.
Inspector Decorator
Chamelingo provides a visual status bar in the Unity Inspector for any GameObject with a Text or TextMeshPro component, indicating its localization status at a glance. This decorator works in conjunction with the Dashboard View to give you complete visibility of localization status throughout your project.
Not Localized Status
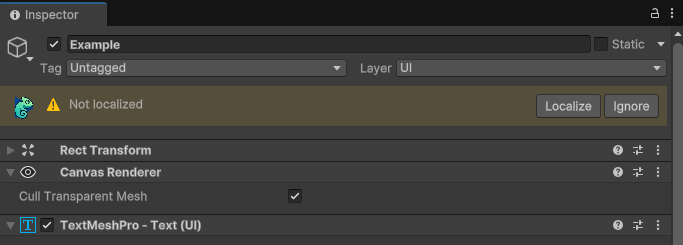
When a text component is not yet localized, the status bar provides two quick actions:
Localize: Adds the appropriate Chamelingo component (ChamelingoTMP or ChamelingoUnityText) to enable localization for this component.
Ignore: Adds the IgnoreLocalization component to mark this component as excluded from localization. A text field is provided to document why this component should remain unlocalized. Learn more in Ignoring Components.
Localized Status
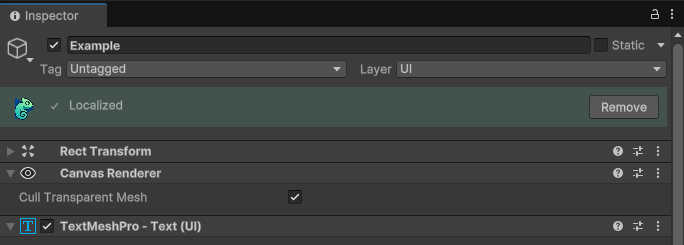
When a component is properly localized and translations are active, the status bar displays a success indicator and provides an option to remove the Chamelingo component if needed.
Ignored Status
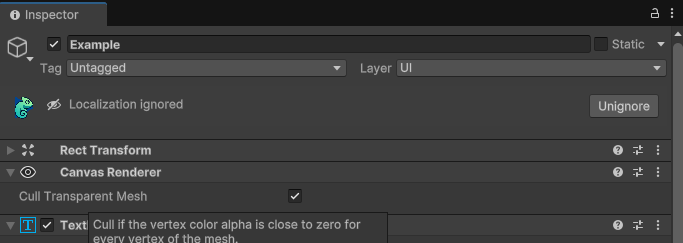
When a component has been marked as ignored (has an IgnoreLocalization script attached), the status bar indicates this state and provides an option to remove the ignore component if you want to localize it later.
Error Status
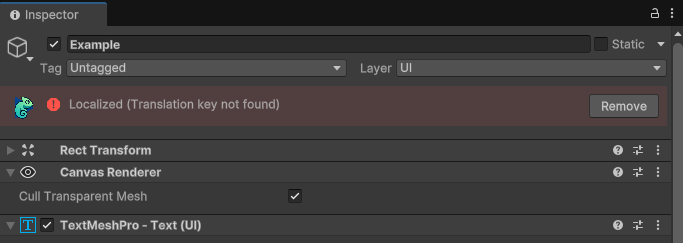
When a localized component has configuration issues, the status bar displays the specific error message along with an option to remove the localization component.
Common Error Causes: - Missing or invalid translation key - Broken component references in composite text mode - Configuration conflicts
Quick Diagnostics
The error message displayed in the status bar helps you quickly identify and resolve localization issues without opening the Chamelingo Hub. For persistent issues, check the FAQ or report an issue.
Translation Completeness Check
The status bar only verifies that the translation key exists in the system. It does not check whether all supported languages have translations for that key. Use the Translations View or Dashboard to verify translation completeness across all languages.
Chamelingo Text Components
Chamelingo provides two component scripts for localizing text: one for TextMeshPro and one for Unity's legacy Text component. Both inherit from the abstract ChamelingoTextBase class, which contains the core functionality, ensuring they share the same features and capabilities.
For architectural details, see the Technical Documentation.
ChamelingoUnityText

For Unity's legacy Text component.
Adding Components
You can add localization components quickly using the Inspector Decorator or the Dashboard View context menu.
ChamelingoTMP

For TextMeshPro TMP_Text component.
Normal Translation Mode
The simplest way to use Chamelingo Text Components is in Normal mode (with Use Composite Text unchecked). This mode is perfect for static text that doesn't require dynamic values.
For advanced scenarios with dynamic content, see Composite Text Mode.
Translation Key Selection
Enter a translation key or select an existing one from the dropdown menu on the right side of the input field.
Filtering Keys
The dropdown filters keys based on your input. To browse all available keys, simply clear the input field.
Text Casing Options
Configure how the translated text should be formatted:
| Value | Description | Example Input | Example Output |
|---|---|---|---|
None |
No changes applied | "hello world" | "hello world" |
FirstLetterUppercase |
First letter uppercase | "hello world" | "Hello world" |
FirstLetterLowercase |
First letter lowercase | "Hello World" | "hello World" |
AllUppercase |
All letters uppercase | "Hello World" | "HELLO WORLD" |
AllLowercase |
All letters lowercase | "Hello World" | "hello world" |
TitleCase |
First letter of each word uppercase | "hello brave world" | "Hello Brave World" |
Status Information
An info box displays any errors or warnings related to the component's configuration.
Composite Text Mode
For more complex text scenarios, enable Use Composite Text to activate Composite Text mode.
Composite Text allows you to define multiple parameters that can be handled individually within a single text component.
Template Syntax
Define parameters using curly braces {} in your text template:
Example:
{greeting} {username}!
Each parameter (greeting, username) can be configured with different parameter types.
Parameter Types
Translation Key
The parameter references a translation key that gets localized.
Features: - Fully translated based on current language - Text casing options available - Updates automatically on language change
Use Case: Dynamic text that needs localization, like {greeting} → "Hello" / "Hallo" / "Bonjour"
Static Value
A fixed text value that doesn't change.
Features: - No translation applied - Remains constant regardless of language
Use Case: Fixed labels, punctuation, or formatting characters
Plain Text Alternative
You can also type normal text directly in the template without wrapping it in {}. Both approaches work identically.
Runtime Parameter
A value set programmatically at runtime through code.
Setting Values:
textComponent.SetParameter("username", "Alice");
Features: - Set dynamically from any script - Supports fallback values if not set - Updated on-demand
Use Case: Player names, scores, dynamic values that change during gameplay
See Also: API Reference - SetParameter for complete runtime parameter documentation
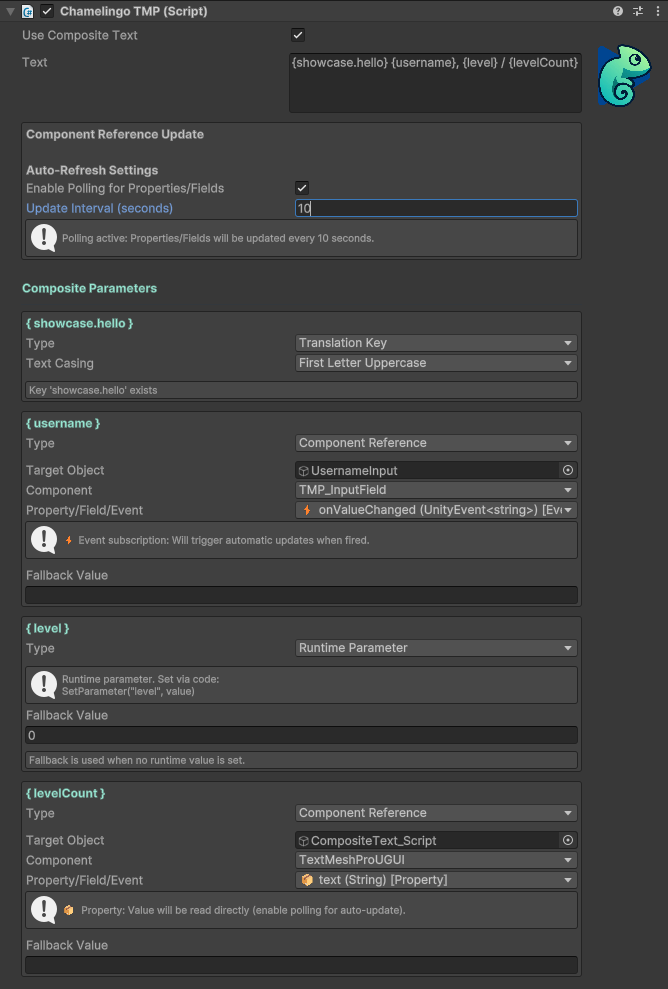
Component Reference
References a GameObject component's field, property, or event for dynamic value updates.
Setup: 1. Select a GameObject 2. Choose a component 3. Select a field, property, or event
Update Methods
Field/Property (Initial Read):
- Value is read once when the component initializes
- Best for values that never change during runtime
- Can be manually refreshed with textComponent.RefreshCompositeText()
Field/Property (Polling): - Enable Enable Polling in Component Reference Update Settings - Set the polling interval (in seconds) - Value updates automatically at specified intervals
Performance Consideration
Polling introduces continuous overhead. Use sparingly and only when necessary.
UnityEvent
- Marked with a lightning bolt ⚡ icon in the dropdown
ChamelingoTextBasesubscribes to the event- Updates immediately when the event fires
- No polling overhead — most efficient method
Best Practice
Prefer UnityEvent callbacks over polling whenever possible for better performance.
Fallback Values
For Runtime Parameter and Component Reference types, you can specify a fallback value that displays when: - A runtime parameter hasn't been set yet - Component reference polling fails - Event callback is never fired
This ensures your text always displays something meaningful, even if the dynamic value isn't available.
Example: Complete Composite Text
Template:
{greeting}, {username}! Your score: {score}
Configuration:
- greeting → Translation Key (key: "ui.greeting", casing: TitleCase)
- username → Runtime Parameter (fallback: "Player")
- score → Component Reference (ScoreManager.CurrentScore, polling enabled)
Result: "Hello, Alice! Your score: 1250"
See It In Action
The Showcase Sample Scene includes practical examples of all composite text parameter types working together.
Custom Localizer

The Custom Localizer extends Chamelingo's localization capabilities beyond text to support any component property or field. This powerful feature allows you to localize Unity Objects (Sprites, Textures, Materials, AudioClips, etc.) and primitive types (int, float, Color, Vector3, enums, etc.) based on the current language.
Overview
While Chamelingo Text Components handle text localization, the Custom Localizer enables you to:
- Localize UI Graphics - Change sprites, icons, or images per language
- Localize Materials - Swap materials with language-specific textures
- Localize Audio - Use different audio clips for different languages
- Localize Colors - Adjust UI colors based on regional preferences
- Localize Numeric Values - Configure different gameplay values per region
- Localize Any Property - Any public property or field on any component
Supported Types
Unity Objects
- Sprite
- Texture (Texture2D, Texture3D, etc.)
- Material
- AudioClip
- AnimationClip
- GameObject
- ScriptableObject
- Any other
UnityEngine.Object-derived type
Primitive Types
- Numeric:
int,float,double,long,short,byte,decimal - Text:
string - Boolean:
bool - Enums: Any enum type
Unity Value Types
Vector2(format: "x,y")Vector3(format: "x,y,z")Vector4(format: "x,y,z,w")Color(format: "r,g,b" or "r,g,b,a")Quaternion(format: "x,y,z,w")
Adding a Custom Localizer
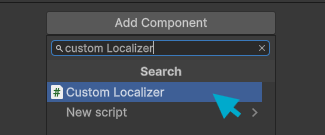
Via Inspector:
- Select a GameObject in your scene
- Click Add Component in the Inspector
- Search for "Custom Localizer" or navigate to Chamelingo → Custom Localizer
Via Menu:
Component → Chamelingo → Custom Localizer
Automatic Detection
Custom Localizers appear automatically in the Dashboard alongside text components.
Configuring the Custom Localizer
Step 1: Select Target Component
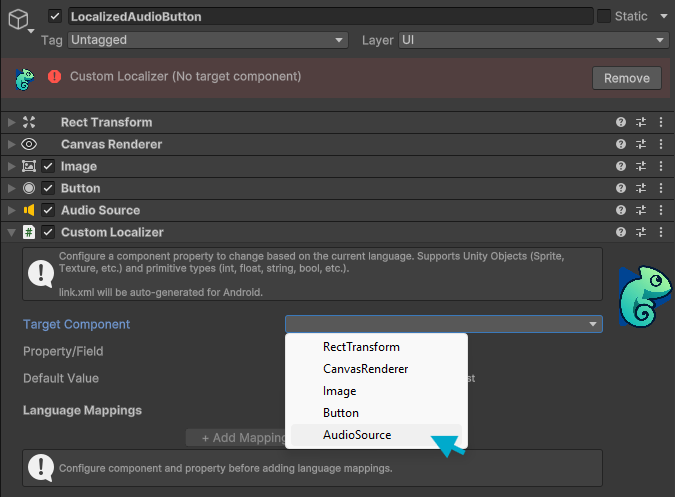
Use the dropdown to select which component on the GameObject you want to localize. The dropdown shows all components attached to the same GameObject.
Step 2: Select Property/Field
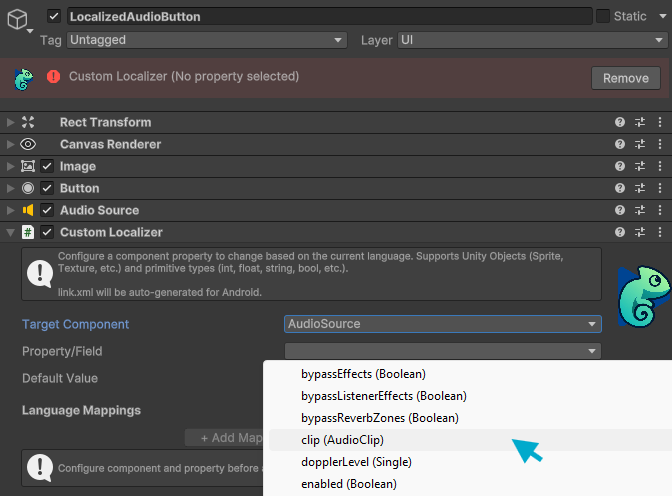
Choose which property or field on that component should be localized. The dropdown displays: - Public properties with setters - Public fields - Type information for each property
Automatic Type Detection
Chamelingo automatically detects whether the selected property is a Unity Object or primitive type and adjusts the editor interface accordingly.
Step 3: Configure Default Value
Set a fallback value to use when no language-specific mapping exists. This ensures your component always has a valid value.
- Unity Objects: Drag and drop an object reference
- Primitive Types: Enter the value as text
Step 4: Add Language Mappings
Click Add All Languages to automatically create mappings for all configured languages, or add them manually using the Add Mapping button.
Step 5: Set Language-Specific Values
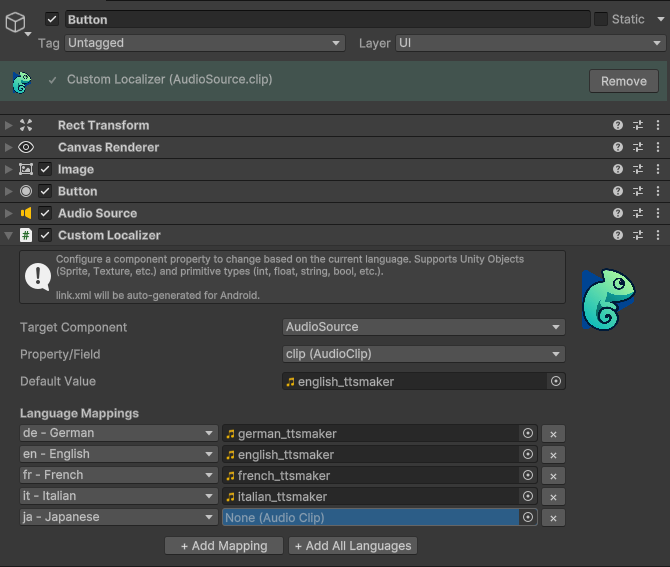
For each language, provide the appropriate value:
- Unity Objects: Drag and drop object references
- Primitive Types: Enter values in the text field
Example: Localizing a Sprite
A common use case is changing UI graphics based on language, such as flags, icons, or text-as-image buttons.
Setup:
1. Add an Image component to a GameObject
-
Add a
ChamelingoCustomLocalizercomponent -
Target Component: Image
-
Property: sprite
-
Value Type: UnityObject (auto-detected)
-
Default Value: Your default sprite asset
-
Language Mappings:
en: English flag spritees: Spanish flag spritefr: French flag spritede: German flag sprite
Result: The sprite automatically changes when the user switches languages.
IL2CPP Code Preservation
The Custom Localizer uses reflection to access properties of other components, which can cause issues when building for platforms that use IL2CPP compilation. IL2CPP optimizes code by stripping away unused properties, which may break reflection-based access.
To resolve this, Chamelingo automatically generates a link.xml file in your root Assets folder before building. This file prevents the Unity compiler from stripping away reflection-accessed properties. This automatic generation only occurs when your build target is set to a platform that uses IL2CPP compilation, such as Android, iOS, or WebGL.
Automatic Generation
The link.xml file is generated automatically during the build process when needed. You don't need to manually create or maintain this file—Chamelingo handles it for you.
Performance Considerations
Reflection-Based Access:
- Custom Localizer uses .NET reflection to access properties
- PropertyInfo/FieldInfo is cached on first use for performance
- Minimal runtime overhead
Update Frequency: - Properties only update when language changes - No per-frame polling or updates - Event-driven architecture ensures efficiency
Best Practices: - Minimize the number of Custom Localizers per GameObject when possible - Avoid localizing properties that change frequently in gameplay - Use default values to ensure components work even without mappings
Troubleshooting
Property Not Updating
If the property doesn't update when language changes: - Verify the target component is set correctly - Check that the property name matches exactly (case-sensitive) - Ensure the property has a public setter or is a public field - Check the Unity console for error messages
Parse Errors for Primitives
If you get parse errors for primitive values:
- Verify the format matches the expected pattern (e.g., "x,y,z" for Vector3)
- Use period (.) for decimal separators, not comma (,)
- Ensure no extra spaces except after commas in vectors/colors
- Check that enum values match the enum definition
Component Reference Missing
If you see "Missing Script" errors: - Ensure the Chamelingo package is properly imported - Re-import the package if necessary - Check that GUIDs match in .meta files
API Reference
For programmatic access to Custom Localizer, see: - API Reference - Custom Localizer
Language Selection Dropdown
Chamelingo provides a ready-to-use language selection dropdown prefab that can be easily added to your scene. This component automatically integrates with your configured languages and handles language persistence.
Adding to Your Scene
Insert the Language Selection Dropdown into your scene using either method:
Via Menu:
GameObject -> UI -> Chamelingo -> Language Selection
Via Context Menu: Right-click in the Hierarchy window and select the same path.
The prefab is a pre-configured TextMeshPro dropdown with the LanguageSelection script already attached and properly configured to avoid showing as errors in the Dashboard.
Configuration

The Language Selection script can be configured through the Inspector to customize how languages are displayed.
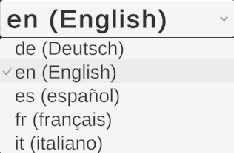
Display Mode Options
Choose how language names should appear in the dropdown:
| Display Mode | Example Output |
|---|---|
| Code | "en", "de", "fr" |
| Native Name | "English", "Deutsch", "Français" |
| English Name | "English", "German", "French" |
| Code + Native | "en (English)", "de (Deutsch)", "fr (Français)" |
| Code + English | "en - English", "de - German", "fr - French" |
| Native + English | "English (English)", "Deutsch (German)", "Français (French)" |
Sorting Options
Sort Alphabetically: Enable this checkbox to automatically sort language options in alphabetical order based on the selected display mode.
Automatic Behavior
The Language Selection Dropdown provides seamless functionality out of the box:
Automatic Population: - Automatically populates with all configured languages from your Project Settings - No manual setup required for language options
Language Switching: - Automatically switches the active language when a selection is made - Triggers all language change events and updates all localized components - See API Reference - Language Change Events for programmatic event handling
Persistence:
- Language selection is automatically saved to PlayerPrefs
- Persists across app sessions and device restarts
- No additional code required
- Learn more about Language Persistence
Custom Implementation
You can create your own language selection UI by:
- Using the LanguageSelection script on your custom dropdown
- Implementing language switching programmatically via code
See Also: - API Reference - LoadLanguage - Programmatically switch languages - API Reference - GetAvailableLanguages - Retrieve configured languages - API Reference - Language Change Events - Subscribe to language change notifications
Zero Configuration
Simply place the dropdown prefab in your UI and it works automatically. The dropdown handles language population, switching, and persistence without any additional setup.
Showcase - Sample Scene
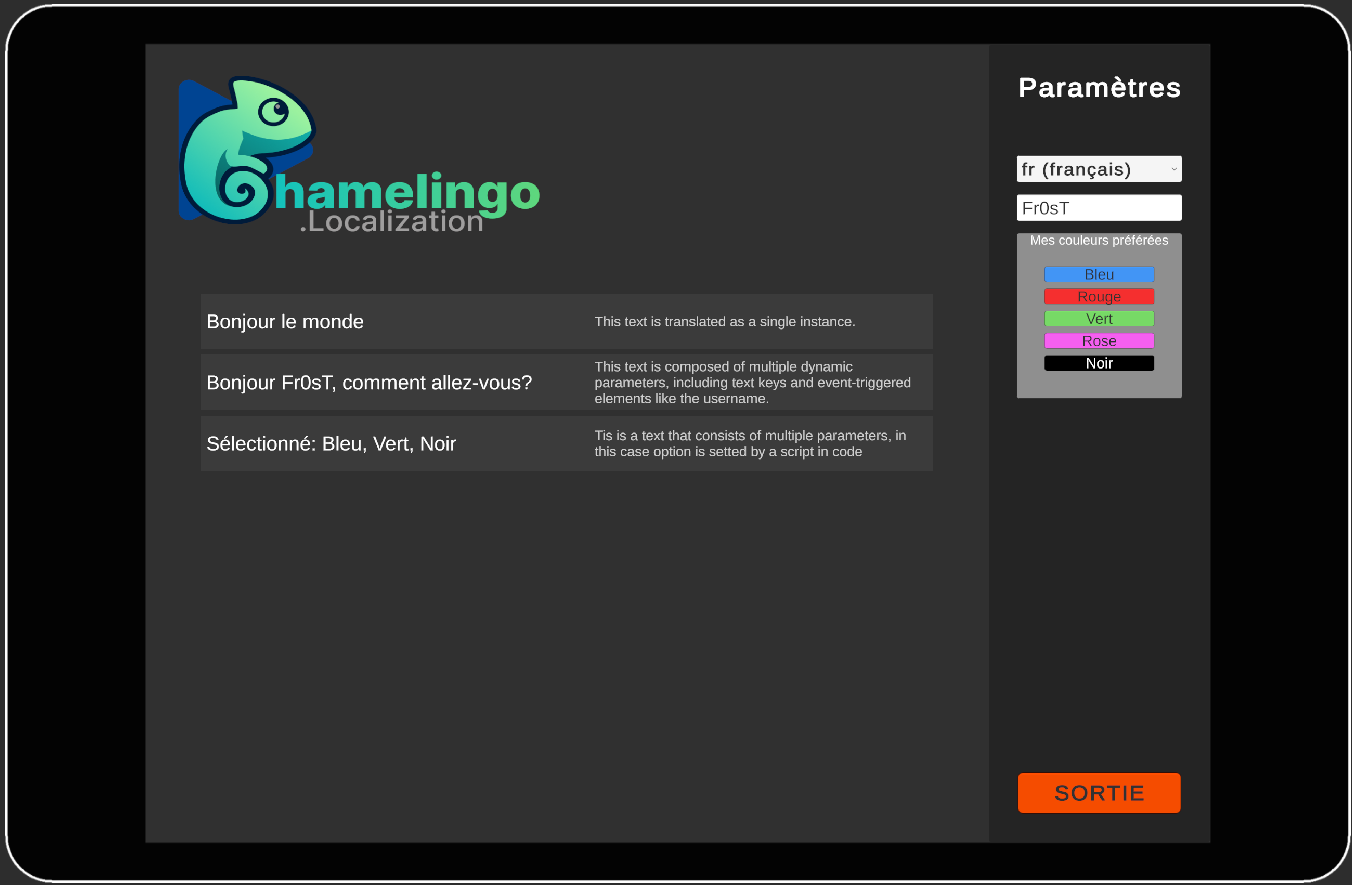
Chamelingo includes a showcase sample scene demonstrating all major features in a compact, easy-to-explore format. This is an excellent learning resource for understanding how different features work together in practice.
What's Included
The sample scene demonstrates:
- Translation by Keys - Basic localization using translation keys
- Composite Text - Examples of all parameter types (Translation Key, Static Value, Runtime Parameter, Component Reference)
- Custom Localizers - Different use cases showing how to localize images and audio clips with Custom Localizers
- Language Selection - Interactive language switching with the Language Selection Dropdown
- API Usage - Script examples showing how to use the Chamelingo API programmatically
Importing the Sample Scene
Import the showcase scene through the Unity Package Manager:
Window -> Package Manager -> Chamelingo -> Samples -> Import
You can also import the sample quickly from the Welcome View in the Chamelingo Hub.
First-Time Setup
When you load the showcase sample scene for the first time, Chamelingo automatically adds sample translations to your project. These translations are safe to import and will not overwrite any existing translation keys, even if you have keys with identical names.
Using the Sample Scene
Explore the scene to see practical implementations of:
- How text components are configured
- How composite text parameters work together
- How Custom Localizer work
- How language switching affects all localized elements
- How to interact with Chamelingo through the C# API
Learning Resource
Use the sample scene as a reference when implementing localization in your own project. The scripts and component configurations provide practical examples of best practices.
Additional Resources
For more information about Chamelingo:
- Getting Started Guide - Complete setup walkthrough for new users
- API Reference - Comprehensive C# API documentation
- Technical Documentation - Architecture and system internals
- FAQ - Frequently asked questions and troubleshooting
- Report Issues - Submit bug reports and feature requests
- Chamelingo Overview - Return to main Chamelingo page